We´re building the FAQ side at the moment. If you don’t find the right answer in the video section write us an email at
Info@smart-dental.de
and we will to help you so fast as possible.
First steps
How I can install AxioPrisa Software?
To download and install our AxioPrisa Software, download the install file from our website. At the moment it is only supported by Windows systems. After downloading the install file, double click on the *.exe file and follow the install instruction. In our video section you find a video about the installing process.
After you have installed and opened our AxioPrisa software, you will need to enter all your data for your own account. After this step we will send you a verification email with a link for activation. After activating your account with the link, you can go back to the AxioPrisa software and enter your license key.
In our video section you find a video about the process.
The Axioprisa license is bound to both your email address and the computer it is installed on. If you change either your email address or your computer, please contact us so we can change your license.
First, the patient must also participate, as he has to hold the transferbow right in place, means in contact up to the porion.
Have all prepare from the begining. Give the patient the transforbow so that he only holds it with two fingers at the back end of the bow, close to the earpiece.
Now the patient inserts slowly the earpieces and pushes upwards. Now fix the Nasion support.
attach some bite material (eg. vinyl-poly-siloxane) in the Axiojig and let the patient bite edge to edge.
Close now the side screw of axioprisa.
After the materials sets, the patient can open the mountha nd you can start to scan.
Note: the patients holds all the time even during scanning the transferbow in place.
In our video section you find a video about the process.
First try to disable the AI (Artificial Intelligence). This harms the scanning process and reduces the scanning field, which varies among the intra-Oral-scanners.
We recommend that you start to scan at first the bite element, then continue to scan the occlusoin from first premolar left and right and then continue to move forward along the sagital bar until you can fully scan the landing pattern.
Make sure, that especially the connection between teeth and bite element is gapless, like the transition from scanbar to landing pattern.
At the end, you can still scan some more from the occlusion, but no need to scan palatinal or buccal side.
In our video section you find a video about the process.
The yellow bite elements are made of a special plastic that meets the requirements for a medical device. (For patient safety reasons, it is not advisable to reuse disposable medical devices). They can be autoclaved and recycled, but we recommend using them only once, otherwise the accuracy of the matching process cannot be guaranteed. It is better to buy new, just look in our shop.
The system is currently available for the SAM Axioquick transfer bow with dovetail connection, for AmannGirrbach Rotofix, Denar Slidematic, Panadent Panamount, and soon also for KaVo Protar. Take a look around our shop and find the right device for you.
In general, you can use any intra-oral-scanner. It is just important that you can export afterwards an open >.stl< or >.ply< -file.
But we recommend you to use the 3shape Trios, as we cooperate since the start in 2013 and all test were made and based on the Trios.
If you are using a different brand, please feel free to contact us and we will work out a solution together. Don’t hesitate.
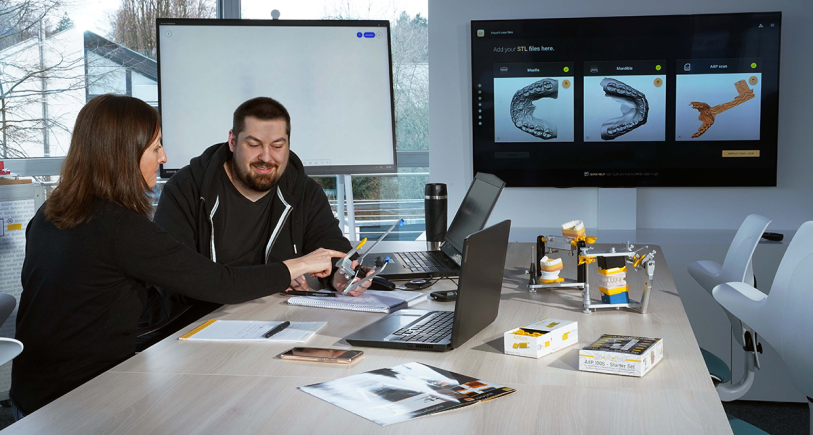
After all scans have been performed, open the AxioPrisa software and follow the instructions. In the first step you have to select your facebow and the articulator you have chosen. In the next step you can import your files. It is possible to select all three files in one step and open them. Then you just have to tell the software which scan you have loaded.
In our video section you find a video about the process.
Which points are the best to select for alignment?
Any three points you can find on both scans will work. It’s best to use points that are far apart, because then your clicks don’t need to be very precise and zooming the models is rarely required. Internally we often use two points on premolars and one point on an incisor.
In our video section you find a video about the process.
Will the software be also available in other languages?
Right now, the software is only available in english, as it is the commen international language in denistry in the world.
But for sure we want to please our valued customers, especially those who deligate the work in the clinic to cooleagues who don’t know so well the english language.
We expect to get in 2023 a release in german, spanish, portugese, italian, russian, japanese and chinese. Depending on the request on other countries, further languages may follow sooner or later.
We will let you know what happened if you subscribe to our newsletter.
After exporting the files you will have a .stl file named “AXP-…-axis-orbital-plane.2_axis.stl”, import this file into your CAD software.
import this file into your CAD software. The corners of the triangle correspond to the SAM system: Two are condyle centers, and one is the tip of the incisal pin (touching the incisal table). This triangle lies on the axis orbital plane. If you need help, please feel free to contact us and we will work out a solution together. Don’t hesitate.